

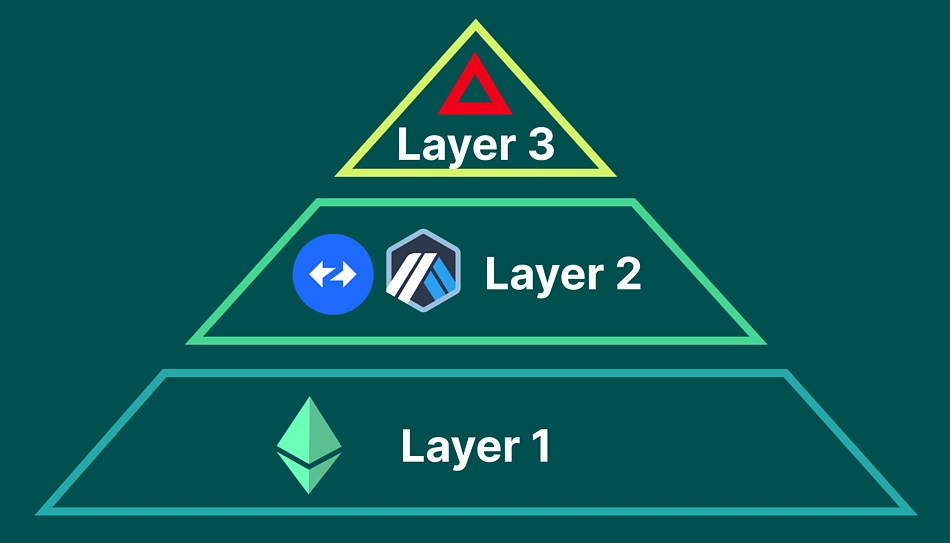
Layer-3 decentralized apps (dApps) are the next big thing in blockchain, sitting atop Layer-1 (like Ethereum) and Layer-2 (like Arbitrum) to deliver specialized, lightning-fast applications. Think of them as apps tailored for specific needs, like gaming or DeFi, with their own data rules. This beginner-friendly tutorial shows you how to build a Layer-3 dApp using an SDK and a custom Data Availability (DA) layer, coded in JavaScript and Solidity. Let’s explore the cutting-edge of Web3!

What Are Layer-3 dApps?
Layer-3 dApps are specialized applications that run on top of Layer-1 (core blockchain) and Layer-2 (scaling solutions). They focus on specific use cases, like privacy, gaming, or AI, by customizing data handling and computation. A key component is the Data Availability (DA) layer, which ensures data is accessible for verification without clogging the main chain.
Key features of Layer-3 dApps include:
- Customization: Tailored logic for specific use cases.
- Scalability: Offload data and computation from Layer-1/2.
- Interoperability: Connect with Ethereum, Polygon, or other chains.
Our dApp will store transaction data off-chain with a custom DA layer and verify it on Ethereum.
Why Build Layer-3 dApps?
In 2025, Layer-3 is gaining traction for hyper-efficient dApps. Building one lets you:
- Innovate: Create dApps for niche markets like DeFi or gaming.
- Learn Web3: Master advanced blockchain concepts like DA.
- Scale Efficiently: Reduce costs and improve performance.
This tutorial will teach you how to set up an SDK and build a DA layer for a simple Layer-3 dApp.
Tools You’ll Need
To build the Layer-3 dApp, gather these tools:
- Node.js: For JavaScript execution. Download from nodejs.org.
- Hardhat: For Ethereum smart contracts. Install via
npm install --save-dev hardhat. - Ethers.js: For Ethereum interactions. Install with
npm install ethers. - IPFS: For off-chain data storage. Install with
npm install ipfs-http-client. - MetaMask: For wallet integration. Get it at metamask.io.
- React: For the front-end. We’ll set this up later.
These tools are standard for Web3 development and beginner-friendly.
Step-by-Step: Building a Layer-3 dApp
We’ll create a Layer-3 dApp for a decentralized messaging system. Messages are stored off-chain using IPFS as a custom DA layer, and their hashes are verified on Ethereum. A React front-end will let users send and retrieve messages. Let’s get started!
Step 1: Set Up the Hardhat Project
Create a project directory and initialize Hardhat:
mkdir layer3-dapp
cd layer3-dapp
npx hardhat
npm install @openzeppelin/contracts
Choose the JavaScript project option. Hardhat sets up a Solidity environment.
Step 2: Write the Ethereum Smart Contract
Create contracts/MessageDA.sol to verify message hashes:
// SPDX-License-Identifier: MIT
pragma solidity ^0.8.0;

import "@openzeppelin/contracts/access/Ownable.sol";

contract MessageDA is Ownable {
    mapping(address => string) public messageHashes;
    event MessageStored(address indexed user, string ipfsHash);

    constructor() Ownable(msg.sender) {}

    // Store message hash
    function storeMessage(string memory ipfsHash) public {
        require(bytes(ipfsHash).length > 0, "Invalid IPFS hash");
        messageHashes[msg.sender] = ipfsHash;
        emit MessageStored(msg.sender, ipfsHash);
    }

    // Retrieve message hash
    function getMessage(address user) public view returns (string memory) {
        return messageHashes[user];
    }
}
Code Walkthrough:
- Imports: Uses OpenZeppelin’s
Ownablefor future access control. - State Variables: A mapping stores each user’s latest message hash (IPFS CID).
- storeMessage: Saves the IPFS hash and emits an event.
- getMessage: Retrieves the hash for a user.
This contract acts as the Layer-3 verification layer, linking to off-chain data.

Step 3: Deploy the Contract
Create a deployment script in scripts/deploy.js:
const hre = require("hardhat");

async function main() {
    const MessageDA = await hre.ethers.getContractFactory("MessageDA");
    const messageDA = await MessageDA.deploy();
    await messageDA.deployed();
    console.log("MessageDA deployed to:", messageDA.target);
}

main().catch((error) => {
    console.error(error);
    process.exitCode = 1);
});
Configure hardhat.config.js for Sepolia (use an API key from Infura or Alchemy):
require("@nomicfoundation/hardhat-toolbox");

module.exports = {
    solidity: "0.8.0",
    networks: {
        sepolia: {
            url: "https://sepolia.infura.io/v3/YOUR_API_KEY",
            accounts: ["YOUR_PRIVATE_KEY"]
        }
    }
};
Deploy with npx hardhat run scripts/deploy.js --network sepolia. Note the contract address.
Step 4: Set Up the Custom DA Layer with IPFS
Use IPFS as the DA layer to store message data off-chain. Install the IPFS client:
npm install ipfs-http-client
For simplicity, use Infura’s IPFS service (infura.io) or run a local IPFS node:
npm install -g ipfs
ipfs init
ipfs daemon
Test IPFS by adding a message:
echo "Hello, Layer-3!" > message.txt
ipfs add message.txt
This outputs a hash (CID) like Qm.... Access it at https://ipfs.io/ipfs/YOUR_HASH.
Step 5: Build the Layer-3 SDK
Create a JavaScript SDK to interact with IPFS and the Ethereum contract. Create sdk/l3-sdk.js:
const { create } = require('ipfs-http-client');
const { ethers } = require('ethers');

class Layer3SDK {
    constructor(contractAddress, contractABI, ipfsConfig) {
        this.ipfs = create(ipfsConfig);
        this.provider = new ethers.JsonRpcProvider('https://sepolia.infura.io/v3/YOUR_API_KEY');
        this.contract = new ethers.Contract(contractAddress, contractABI, this.provider);
    }

    async storeMessage(message, wallet) {
        const { path } = await this.ipfs.add(Buffer.from(message));
        const signer = wallet.connect(this.provider);
        const tx = await this.contract.connect(signer).storeMessage(path);
        await tx.wait();
        return path;
    }

    async getMessage(address) {
        return await this.contract.getMessage(address);
    }
}

module.exports = Layer3SDK;
This SDK:
- Uploads messages to IPFS and gets the CID.
- Stores the CID in the Ethereum contract.
- Retrieves CIDs from the contract.
Use Infura IPFS credentials or a local node for ipfsConfig.
Step 6: Build a React Front-End
Create a React app to let users send and view messages:
npx create-react-app l3-dapp
cd l3-dapp
npm install ethers ipfs-http-client
Replace src/App.js with:
import { useState } from 'react';
import { ethers } from 'ethers';
import Layer3SDK from '../sdk/l3-sdk'; // Adjust path
import './App.css';

const contractAddress = 'YOUR_CONTRACT_ADDRESS';
const contractABI = [/* YOUR_CONTRACT_ABI */];
const ipfsConfig = {
    host: 'ipfs.infura.io',
    port: 5001,
    protocol: 'https',
    headers: {
        authorization: 'Basic ' + btoa('YOUR_PROJECT_ID:YOUR_API_KEY')
    }
};

function App() {
    const [account, setAccount] = useState(null);
    const [message, setMessage] = useState('');
    const [retrievedMessage, setRetrievedMessage] = useState('');
    const sdk = new Layer3SDK(contractAddress, contractABI, ipfsConfig);

    const connectWallet = async () => {
        if (window.ethereum) {
            const provider = new ethers.BrowserProvider(window.ethereum);
            const accounts = await provider.send('eth_requestAccounts', []);
            setAccount(accounts[0]);
        } else {
            alert('Install MetaMask!');
        }
    };

    const sendMessage = async () => {
        if (!account || !message) return;
        const provider = new ethers.BrowserProvider(window.ethereum);
        const signer = await provider.getSigner();
        const hash = await sdk.storeMessage(message, signer);
        alert(`Message stored! IPFS Hash: ${hash}`);
    };

    const getMessage = async () => {
        if (!account) return;
        const hash = await sdk.getMessage(account);
        if (hash) {
            const response = await fetch(`https://ipfs.io/ipfs/${hash}`);
            const text = await response.text();
            setRetrievedMessage(text);
        }
    };

    return (
        Layer-3 Messaging dApp
            {!account ? (
                Connect Wallet
            ) : (
                Connected: {account}Send Message
Related Articles

Written by Guru Tony
Guru Tony is a cryptocurrency analyst and educator with over seven years of hands-on experience in blockchain technology, DeFi, yield strategies and crypto tax. He builds the free calculators on this site and tests every strategy he writes about with his own capital. Read more about our editorial approach.