

Layer-3 decentralized apps (dApps) are the next big thing in blockchain, sitting atop Layer-1 (like Ethereum) and Layer-2 (like Arbitrum) to deliver specialized, lightning-fast applications. Think of them as apps tailored for specific needs, like gaming or DeFi, with their own data rules. This beginner-friendly tutorial shows you how to build a Layer-3 dApp using an SDK and a custom Data Availability (DA) layer, coded in JavaScript and Solidity. Let’s explore the cutting-edge of Web3!

What Are Layer-3 dApps?
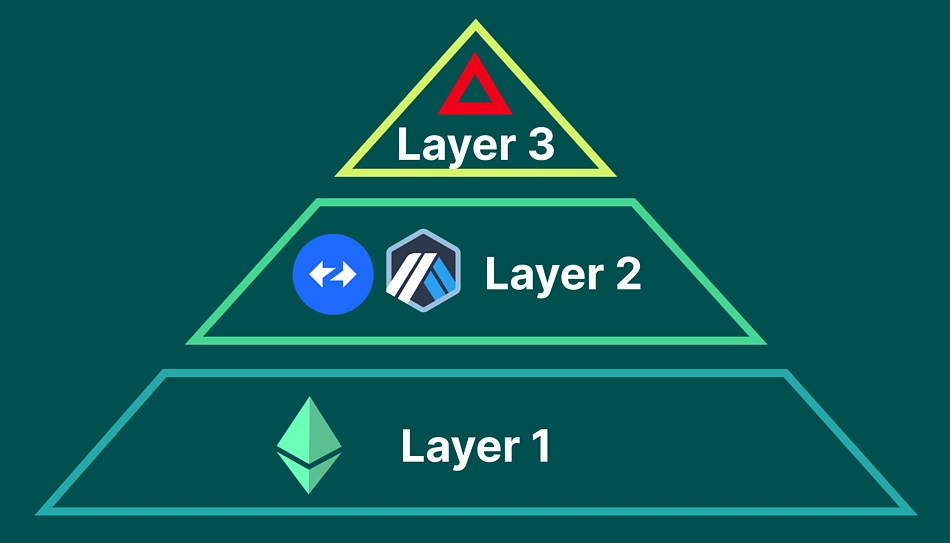
Layer-3 dApps are specialized applications that run on top of Layer-1 (core blockchain) and Layer-2 (scaling solutions). They focus on specific use cases, like privacy, gaming, or AI, by customizing data handling and computation. A key component is the Data Availability (DA) layer, which ensures data is accessible for verification without clogging the main chain.
Key features of Layer-3 dApps include:
- Customization: Tailored logic for specific use cases.
- Scalability: Offload data and computation from Layer-1/2.
- Interoperability: Connect with Ethereum, Polygon, or other chains.
Our dApp will store transaction data off-chain with a custom DA layer and verify it on Ethereum.
Why Build Layer-3 dApps?
In 2025, Layer-3 is gaining traction for hyper-efficient dApps. Building one lets you:
- Innovate: Create dApps for niche markets like DeFi or gaming.
- Learn Web3: Master advanced blockchain concepts like DA.
- Scale Efficiently: Reduce costs and improve performance.
This tutorial will teach you how to set up an SDK and build a DA layer for a simple Layer-3 dApp.
Tools You’ll Need
To build the Layer-3 dApp, gather these tools:
- Node.js: For JavaScript execution. Download from nodejs.org.
- Hardhat: For Ethereum smart contracts. Install via
npm install --save-dev hardhat. - Ethers.js: For Ethereum interactions. Install with
npm install ethers. - IPFS: For off-chain data storage. Install with
npm install ipfs-http-client. - MetaMask: For wallet integration. Get it at metamask.io.
- React: For the front-end. We’ll set this up later.
These tools are standard for Web3 development and beginner-friendly.
Step-by-Step: Building a Layer-3 dApp
We’ll create a Layer-3 dApp for a decentralized messaging system. Messages are stored off-chain using IPFS as a custom DA layer, and their hashes are verified on Ethereum. A React front-end will let users send and retrieve messages. Let’s get started!
Step 1: Set Up the Hardhat Project
Create a project directory and initialize Hardhat:
mkdir layer3-dapp
cd layer3-dapp
npx hardhat
npm install @openzeppelin/contracts
Choose the JavaScript project option. Hardhat sets up a Solidity environment.
Step 2: Write the Ethereum Smart Contract
Create contracts/MessageDA.sol to verify message hashes:
// SPDX-License-Identifier: MIT
pragma solidity ^0.8.0;

import "@openzeppelin/contracts/access/Ownable.sol";

contract MessageDA is Ownable {
    mapping(address => string) public messageHashes;
    event MessageStored(address indexed user, string ipfsHash);

    constructor() Ownable(msg.sender) {}

    // Store message hash
    function storeMessage(string memory ipfsHash) public {
        require(bytes(ipfsHash).length > 0, "Invalid IPFS hash");
        messageHashes[msg.sender] = ipfsHash;
        emit MessageStored(msg.sender, ipfsHash);
    }

    // Retrieve message hash
    function getMessage(address user) public view returns (string memory) {
        return messageHashes[user];
    }
}
Code Walkthrough:
- Imports: Uses OpenZeppelin’s
Ownablefor future access control. - State Variables: A mapping stores each user’s latest message hash (IPFS CID).
- storeMessage: Saves the IPFS hash and emits an event.
- getMessage: Retrieves the hash for a user.
This contract acts as the Layer-3 verification layer, linking to off-chain data.

Step 3: Deploy the Contract
Create a deployment script in scripts/deploy.js:
const hre = require("hardhat");

async function main() {
    const MessageDA = await hre.ethers.getContractFactory("MessageDA");
    const messageDA = await MessageDA.deploy();
    await messageDA.deployed();
    console.log("MessageDA deployed to:", messageDA.target);
}

main().catch((error) => {
    console.error(error);
    process.exitCode = 1);
});
Configure hardhat.config.js for Sepolia (use an API key from Infura or Alchemy):
require("@nomicfoundation/hardhat-toolbox");

module.exports = {
    solidity: "0.8.0",
    networks: {
        sepolia: {
            url: "https://sepolia.infura.io/v3/YOUR_API_KEY",
            accounts: ["YOUR_PRIVATE_KEY"]
        }
    }
};
Deploy with npx hardhat run scripts/deploy.js --network sepolia. Note the contract address.
Step 4: Set Up the Custom DA Layer with IPFS
Use IPFS as the DA layer to store message data off-chain. Install the IPFS client:
npm install ipfs-http-client
For simplicity, use Infura’s IPFS service (infura.io) or run a local IPFS node:
npm install -g ipfs
ipfs init
ipfs daemon
Test IPFS by adding a message:
echo "Hello, Layer-3!" > message.txt
ipfs add message.txt
This outputs a hash (CID) like Qm.... Access it at https://ipfs.io/ipfs/YOUR_HASH.
Step 5: Build the Layer-3 SDK
Create a JavaScript SDK to interact with IPFS and the Ethereum contract. Create sdk/l3-sdk.js:
const { create } = require('ipfs-http-client');
const { ethers } = require('ethers');

class Layer3SDK {
    constructor(contractAddress, contractABI, ipfsConfig) {
        this.ipfs = create(ipfsConfig);
        this.provider = new ethers.JsonRpcProvider('https://sepolia.infura.io/v3/YOUR_API_KEY');
        this.contract = new ethers.Contract(contractAddress, contractABI, this.provider);
    }

    async storeMessage(message, wallet) {
        const { path } = await this.ipfs.add(Buffer.from(message));
        const signer = wallet.connect(this.provider);
        const tx = await this.contract.connect(signer).storeMessage(path);
        await tx.wait();
        return path;
    }

    async getMessage(address) {
        return await this.contract.getMessage(address);
    }
}

module.exports = Layer3SDK;
This SDK:
- Uploads messages to IPFS and gets the CID.
- Stores the CID in the Ethereum contract.
- Retrieves CIDs from the contract.
Use Infura IPFS credentials or a local node for ipfsConfig.
Step 6: Build a React Front-End
Create a React app to let users send and view messages:
npx create-react-app l3-dapp
cd l3-dapp
npm install ethers ipfs-http-client
Replace src/App.js with:
import { useState } from 'react';
import { ethers } from 'ethers';
import Layer3SDK from '../sdk/l3-sdk'; // Adjust path
import './App.css';

const contractAddress = 'YOUR_CONTRACT_ADDRESS';
const contractABI = [/* YOUR_CONTRACT_ABI */];
const ipfsConfig = {
    host: 'ipfs.infura.io',
    port: 5001,
    protocol: 'https',
    headers: {
        authorization: 'Basic ' + btoa('YOUR_PROJECT_ID:YOUR_API_KEY')
    }
};

function App() {
    const [account, setAccount] = useState(null);
    const [message, setMessage] = useState('');
    const [retrievedMessage, setRetrievedMessage] = useState('');
    const sdk = new Layer3SDK(contractAddress, contractABI, ipfsConfig);

    const connectWallet = async () => {
        if (window.ethereum) {
            const provider = new ethers.BrowserProvider(window.ethereum);
            const accounts = await provider.send('eth_requestAccounts', []);
            setAccount(accounts[0]);
        } else {
            alert('Install MetaMask!');
        }
    };

    const sendMessage = async () => {
        if (!account || !message) return;
        const provider = new ethers.BrowserProvider(window.ethereum);
        const signer = await provider.getSigner();
        const hash = await sdk.storeMessage(message, signer);
        alert(`Message stored! IPFS Hash: ${hash}`);
    };

    const getMessage = async () => {
        if (!account) return;
        const hash = await sdk.getMessage(account);
        if (hash) {
            const response = await fetch(`https://ipfs.io/ipfs/${hash}`);
            const text = await response.text();
            setRetrievedMessage(text);
        }
    };

    return (
        Layer-3 Messaging dApp
            {!account ? (
                Connect Wallet
            ) : (
                Connected: {account}Send Message