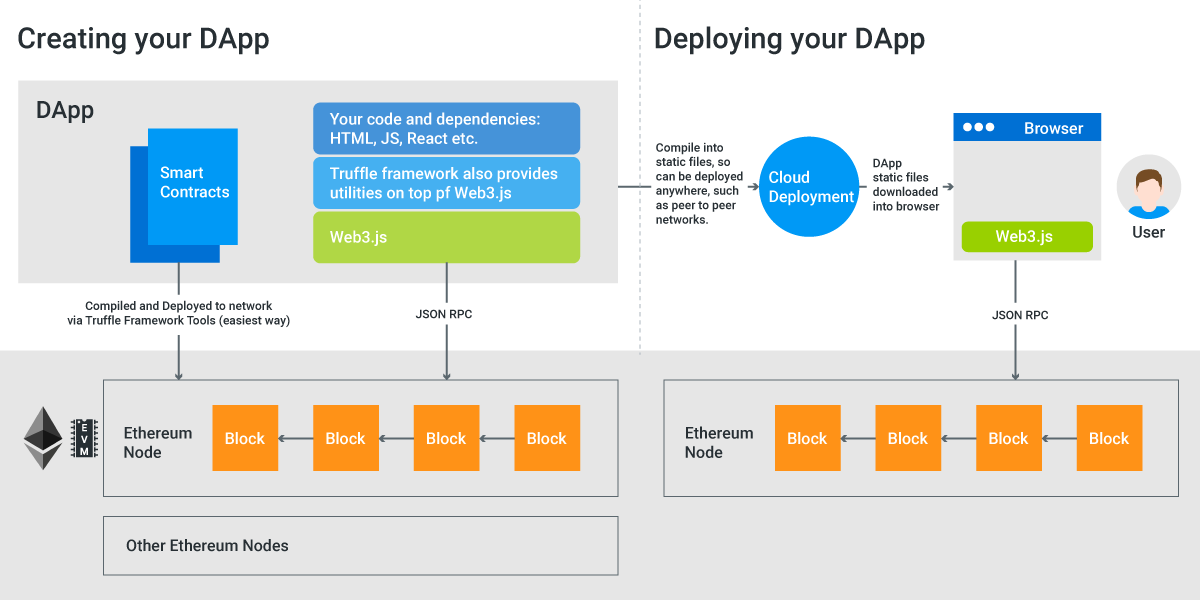
Decentralized applications (DApps) are the future of the internet, running on blockchains like Ethereum to offer secure, transparent services without middlemen. From DeFi platforms to NFT marketplaces, DApps are transforming industries. If you’re a developer eager to build your first DApp, this beginner-friendly tutorial will guide you through creating a simple voting app using Solidity and React. Let’s get started!

What Is a DApp?
A DApp is an application that runs on a blockchain, typically Ethereum. It has two main components:
- Smart Contracts: Backend logic written in Solidity, stored on the blockchain.
- Front-End: A user interface (e.g., a web app) that interacts with the smart contract.
Unlike traditional apps, DApps are decentralized, meaning no single entity controls them. Our voting DApp will let users cast votes securely on the Ethereum blockchain.
Tools You’ll Need
To build your DApp, gather these tools:
- Remix IDE: For writing and deploying Solidity smart contracts. Access at remix.ethereum.org.
- MetaMask: A browser wallet to interact with Ethereum testnets. Download from metamask.io.
- Node.js: For setting up a React front-end. Get it from nodejs.org.
- Hardhat: A development environment for testing and deploying contracts. Install via npm.
- Web3.js: A library to connect your front-end to Ethereum. Available via npm.
- Testnet ETH: Use the Sepolia testnet and get test ETH from sepoliafaucet.com.
With these, you’re ready to build a full-stack DApp.
Step-by-Step: Building Your Voting DApp
We’ll create a DApp where users can vote for candidates, with votes stored on Ethereum. The backend will be a Solidity smart contract, and the front-end will be a React app. Follow these steps to bring it to life!

Step 1: Write the Smart Contract
Open Remix IDE and create a file named Voting.sol. Here’s the Solidity code for a simple voting contract:
// SPDX-License-Identifier: MIT
pragma solidity ^0.8.0;

contract Voting {
    mapping(string => uint256) public votes;
    string[] public candidates;

    constructor(string[] memory _candidates) {
        candidates = _candidates;
    }

    function vote(string memory candidate) public {
        bool isValidCandidate = false;
        for (uint i = 0; i < candidates.length; i++) {
            if (keccak256(abi.encodePacked(candidates[i])) == keccak256(abi.encodePacked(candidate))) {
                isValidCandidate = true;
                break;
            }
        }
        require(isValidCandidate, "Invalid candidate");
        votes[candidate]++;
    }

    function getVotes(string memory candidate) public view returns (uint256) {
        return votes[candidate];
    }
}
This contract:
- Stores candidates and their vote counts.
- Allows users to vote for a candidate.
- Retrieves the vote count for any candidate.
Step 2: Compile and Deploy the Contract
In Remix, go to the “Solidity Compiler” tab, select version 0.8.0+, and compile Voting.sol. Then, in the “Deploy & Run Transactions” tab, connect MetaMask to the Sepolia testnet and deploy the contract with a list of candidates (e.g., [“Alice”, “Bob”]). Approve the transaction in MetaMask.
Copy the deployed contract’s address and ABI (from Remix’s “Compilation Details”) for the front-end.
Step 3: Set Up the React Front-End
Create a new React app using Node.js. Run these commands in your terminal:
npx create-react-app voting-dapp
cd voting-dapp
npm install web3
Replace src/App.js with this code to connect to your smart contract:
import { useState, useEffect } from 'react';
import Web3 from 'web3';
import './App.css';

const contractAddress = 'YOUR_CONTRACT_ADDRESS'; // From Remix
const contractABI = [/* YOUR_CONTRACT_ABI */]; // From Remix

function App() {
  const [web3, setWeb3] = useState(null);
  const [contract, setContract] = useState(null);
  const [candidate, setCandidate] = useState('');
  const [votes, setVotes] = useState({});

  useEffect(() => {
    const init = async () => {
      if (window.ethereum) {
        const web3Instance = new Web3(window.ethereum);
        await window.ethereum.request({ method: 'eth_requestAccounts' });
        setWeb3(web3Instance);
        const contractInstance = new web3Instance.eth.Contract(contractABI, contractAddress);
        setContract(contractInstance);
      }
    };
    init();
  }, []);

  const vote = async () => {
    if (!contract || !candidate) return;
    const accounts = await web3.eth.getAccounts();
    await contract.methods.vote(candidate).send({ from: accounts[0] });
    getVotes(candidate);
  };

  const getVotes = async (candidate) => {
    if (!contract || !candidate) return;
    const voteCount = await contract.methods.getVotes(candidate).call();
    setVotes({ ...votes, [candidate]: voteCount });
  };

  return (
    Voting DApp setCandidate(e.target.value)}
      />
      Vote getVotes(candidate)}>Get Votes
      {candidate && votes[candidate] && (
        {candidate} has {votes[candidate]} votes
      )}

  );
}

export default App;
Update contractAddress and contractABI with your contract’s details. This code connects to MetaMask, lets users vote, and displays vote counts.
Step 4: Style the Front-End
Add basic styling in src/App.css:
.App {
  text-align: center;
  padding: 50px;
}

input {
  padding: 10px;
  margin: 10px;
}

button {
  padding: 10px 20px;
  margin: 5px;
  cursor: pointer;
}
This creates a clean, user-friendly interface.

Step 5: Test Your DApp
Run your React app with npm start. Open it in a browser with MetaMask installed. Connect to Sepolia, enter a candidate’s name (e.g., “Alice”), and click “Vote.” Then, click “Get Votes” to see the updated count. Your DApp is now live, interacting with Ethereum!
Why Build DApps?
Building DApps opens up exciting opportunities:
- Innovation: Create apps for DeFi, NFTs, or gaming, like Uniswap or Axie Infinity.
- Decentralization: Offer users control without relying on centralized servers.
- Career Growth: DApp developers are in high demand in the blockchain industry.
Your voting DApp is a starting point for exploring these possibilities.
Tips for Better DApps
To improve your DApp, consider these tips:
- Optimize Gas: Minimize storage and loops in your contract to reduce fees.
- Enhance Security: Use OpenZeppelin contracts and audit your code. Check SWC Registry for vulnerabilities.
- Test Thoroughly: Use Hardhat to simulate transactions and catch bugs.
- Improve UX: Add loading states and error messages in your front-end.
These practices make your DApp more robust and user-friendly.
Next Steps for DApp Developers
Congratulations on building your first DApp! Here’s how to level up:
- Add Features: Let users add candidates or view all votes in your voting DApp.
- Explore Frameworks: Try Alchemy or Infura for better blockchain connectivity.
- Learn Advanced Solidity: Dive into events and modifiers at docs.soliditylang.org.
- Join Communities: Connect on Ethereum Stack Exchange or Ethereum’s Discord.
Keep building to create innovative decentralized apps.
Conclusion
Building a DApp on Ethereum is an exciting way to dive into blockchain development. With Solidity for the smart contract and React for the front-end, you’ve created a voting app that runs on the Sepolia testnet. This tutorial is just the beginning—DApps offer endless opportunities for creativity and impact.
Try enhancing your DApp, exploring Ethereum tools, or sharing your project with the community. Have questions or ideas? Leave a comment below!


