

Blockchain technology powers cryptocurrencies like Bitcoin and Ethereum, but have you ever wondered how you can participate in the network directly? Running your own blockchain node puts you in control and helps support decentralization. This practical guide will walk you through the entire process – no advanced technical skills required!
What is a Blockchain Node?
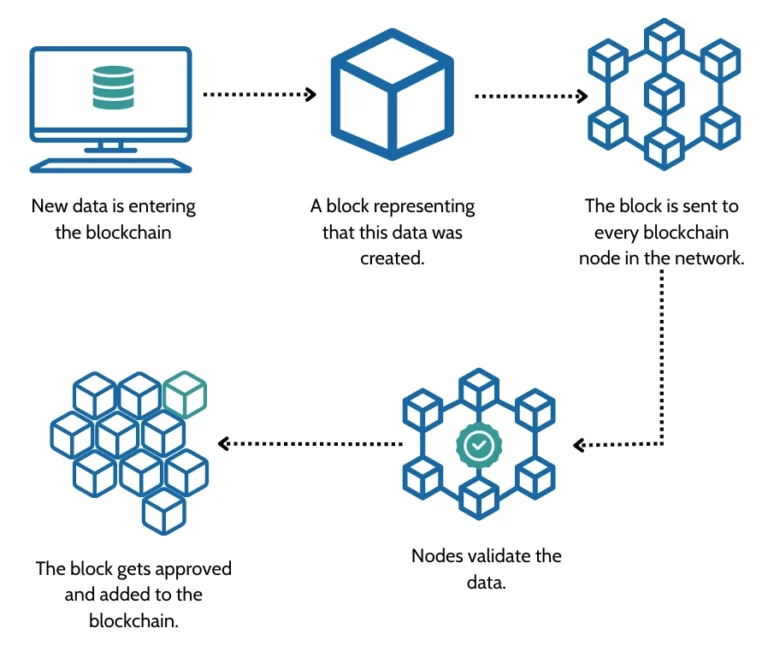
A blockchain node is essentially a computer that connects to a blockchain network. It:
- Stores a copy of the blockchain
- Validates new transactions
- Helps maintain network security
- Can relay information to other nodes
Why Run Your Own Node?
✅ Better Privacy: Don’t rely on third-party services
✅ Full Control: Verify transactions yourself
✅ Support the Network: Help keep blockchain decentralized
✅ Development Access: Essential for building dApps
Choosing Which Blockchain to Run
Popular options for first-time node operators:
| Blockchain | Hardware Requirements | Sync Time | Best For |
|---|---|---|---|
| Bitcoin | 500GB+ storage | 2-7 days | Cryptocurrency purists |
| Ethereum | 2TB+ SSD recommended | 1-3 days | Smart contract developers |
| Litecoin | 100GB+ storage | 1 day | Beginners |
| Dogecoin | 60GB+ storage | <1 day | Low-resource option |

Step 1: Prepare Your Hardware
Minimum Requirements:
- Computer: Modern desktop or laptop (Linux recommended)
- Storage: At least 500GB SSD (1TB+ ideal)
- RAM: 8GB minimum (16GB recommended)
- Internet: Unlimited data plan, 10+ Mbps speed
Pro Tip: Raspberry Pi 4 works for lightweight chains like Dogecoin!
Step 2: Install Necessary Software
For Bitcoin:
- Download Bitcoin Core from bitcoin.org
- Verify the download signature
- Install on your operating system
For Ethereum:
- Choose client software (Geth or OpenEthereum)
- Download from ethereum.org
- Follow installation guide

Step 3: Configure Your Node
Important Settings:
# Sample Bitcoin configuration
server=1
rpcuser=yourusername
rpcpassword=strongpassword
txindex=1
prune=0
Key configurations:
- Pruning: Saves space but limits historical data
- Port Forwarding: Needed for better connectivity (port 8333 for Bitcoin)
- Memory Allocation: Adjust based on your RAM
Step 4: Sync With the Network
This is the longest step – be patient!
What’s Happening During Sync:
- Your node downloads all historical blocks
- Verifies every transaction since genesis
- Builds complete UTXO set
Sync Times:
- Bitcoin: 2-7 days
- Ethereum: 1-3 days
- Litecoin: 6-24 hours

Step 5: Maintain Your Node
Regular Maintenance Tasks:
- Check disk space (blockchains grow constantly)
- Update software regularly
- Monitor connection count (aim for 8+ stable connections)
- Consider using a UPS for power outages
Common Problems & Solutions
Issue: Slow Sync Speed
🔧 Fix:
- Use wired Ethernet connection
- Add peers manually
- Allocate more bandwidth
Issue: Running Out of Disk Space
🔧 Fix:
- Upgrade to larger drive
- Enable pruning (if available)
- Delete and resync (last resort)
Advanced Options to Explore
Once comfortable:
- Run a Lightning Node (for Bitcoin)
- Set up a Validator (for Proof-of-Stake chains)
- Connect to dApp Development
Conclusion
Running your first blockchain node is an exciting way to engage directly with cryptocurrency networks. While the initial setup takes some effort, the benefits of increased privacy, security, and network participation make it worthwhile.
Ready to dive deeper? Check out: